
Wildlife photography is often considered one of the most demanding photographic genres, and it’s easy to see why. That may be a broad statement and open to discussion! Achieving consistent results while tracking fast and unpredictable wildlife sits right at the top of the challenge list! Especially when you factor in birds in flight autofocus settings and technique.
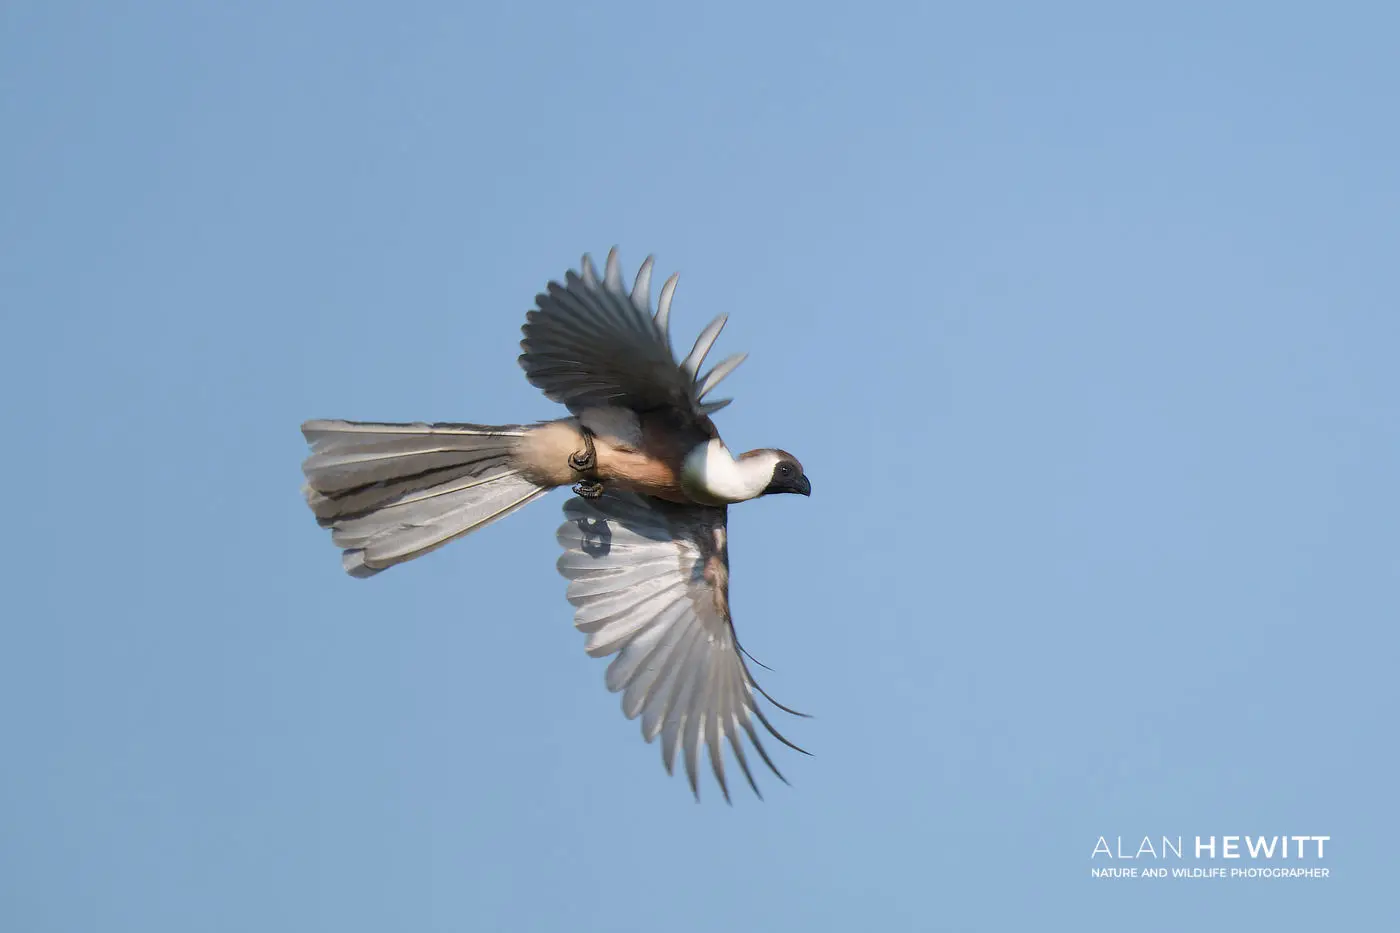
Bare-faced Go-Away Bird, Lemek Conservancy – Fujifilm X-H2S & XF150-600mm
It’s no surprise that the surge in razor-sharp wildlife images has come hand in hand with advances in autofocus technology. But consistent results don’t come from simply half-pressing the shutter and hoping for the best. Modern cameras are packed with autofocus options designed to help with exactly this, but we need to understand them. As Ansel Adams once said, “The single most important component of a camera is the twelve inches behind it.” That wisdom still stands! Mastering birds in flight autofocus needs an understanding of how fine-tuning your camera settings affects your results.
1. Focus Mode
Most cameras offer three or four basic focus options: manual, and then the autofocus modes; single, continuous, and sometimes automatic. Yes, that’s right an auto autofocus mode!
Let’s get the obvious ones out of the way first! Manual focus, forget it! There’s no realistic way to maintain consistency while manually tracking a fast-moving bird in flight. If you can sucessfully manually adjust focus, exposure, and composition all at once then you don’t need to read this!
Single-shot autofocus (often called AF-S or One Shot) isn’t much better for birds in flight autofocus either. When you half-press the shutter (or use AF-On), the camera locks focus at a single distance. If either you or the subject moves, that focus point won’t adjust until you release and re-engage autofocus. By this time, the shot has usually long gone!
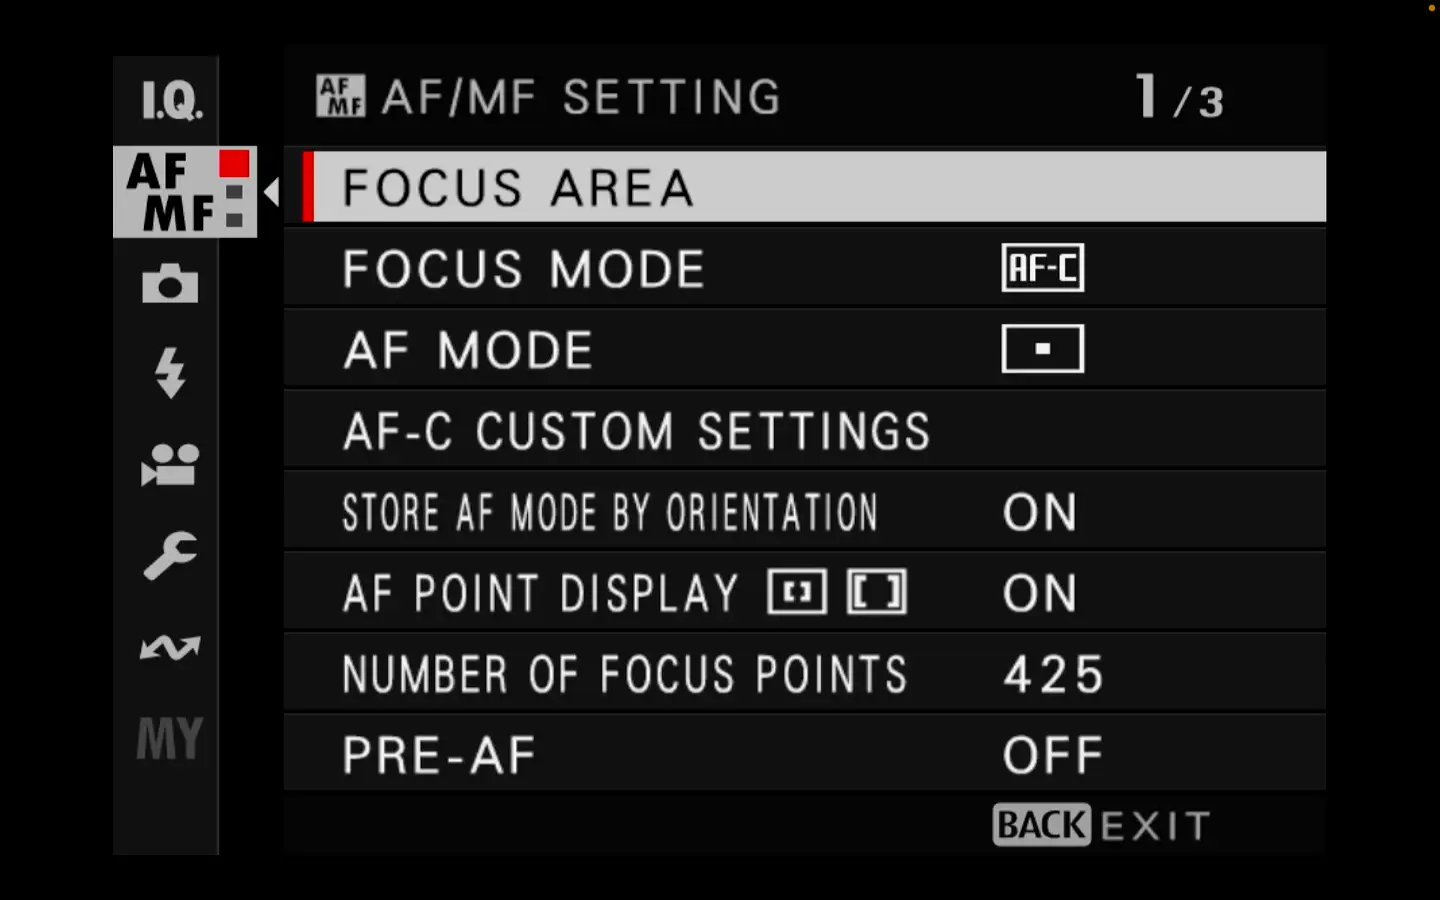
Autofocus menu, Fujifilm X-H2S
Automatic autofocus, found on some but not all cameras (Canon calls it AF-A). It tries to detect whether your subject is moving or still, then switches between single-shot and continuous focus modes. Sounds clever, but for wildlife and birds in flight, it may just add delay. These are moving subjects, so it’s best not to let the camera decide for you.
Continuous Autofocus – Birds in Flight Autofocus Fundamental!
That brings us to continuous autofocus, also known as AF-C, AI Servo, or C-AF, depending on your camera species. This is the essential mode for tracking moving subjects and therefore, birds in flight autofocus. As long as you half-press on the shutter, or press AF-On, the camera continuously adjusts focus as you or your subject moves.
From here on, I’ll refer to autofocus settings in the context of the Fujifilm X-Mount system, since that’s what I use. But the principles apply broadly to whatever species of camera you shoot with and the concepts remain the same.
As for back-button focusing (AF-On), I’ll get to that later in the post. For now, don’t let it complicate things. It’s not the holy grail of successful focus tracking than many people think.
From Blog Inspiration to Safari Adventure!
Wild at Mattikoko – The Great Migration
26th August 2027
7 or 11 nights available
Wild at Mattikoko – The Green Season
March 2028 (TBC)
7 or 11 nights available
Supporting conservation and communities through ethical safaris. Join us on unforgettable photography safaris led by professional guides and photographers.
2. Subject Detection
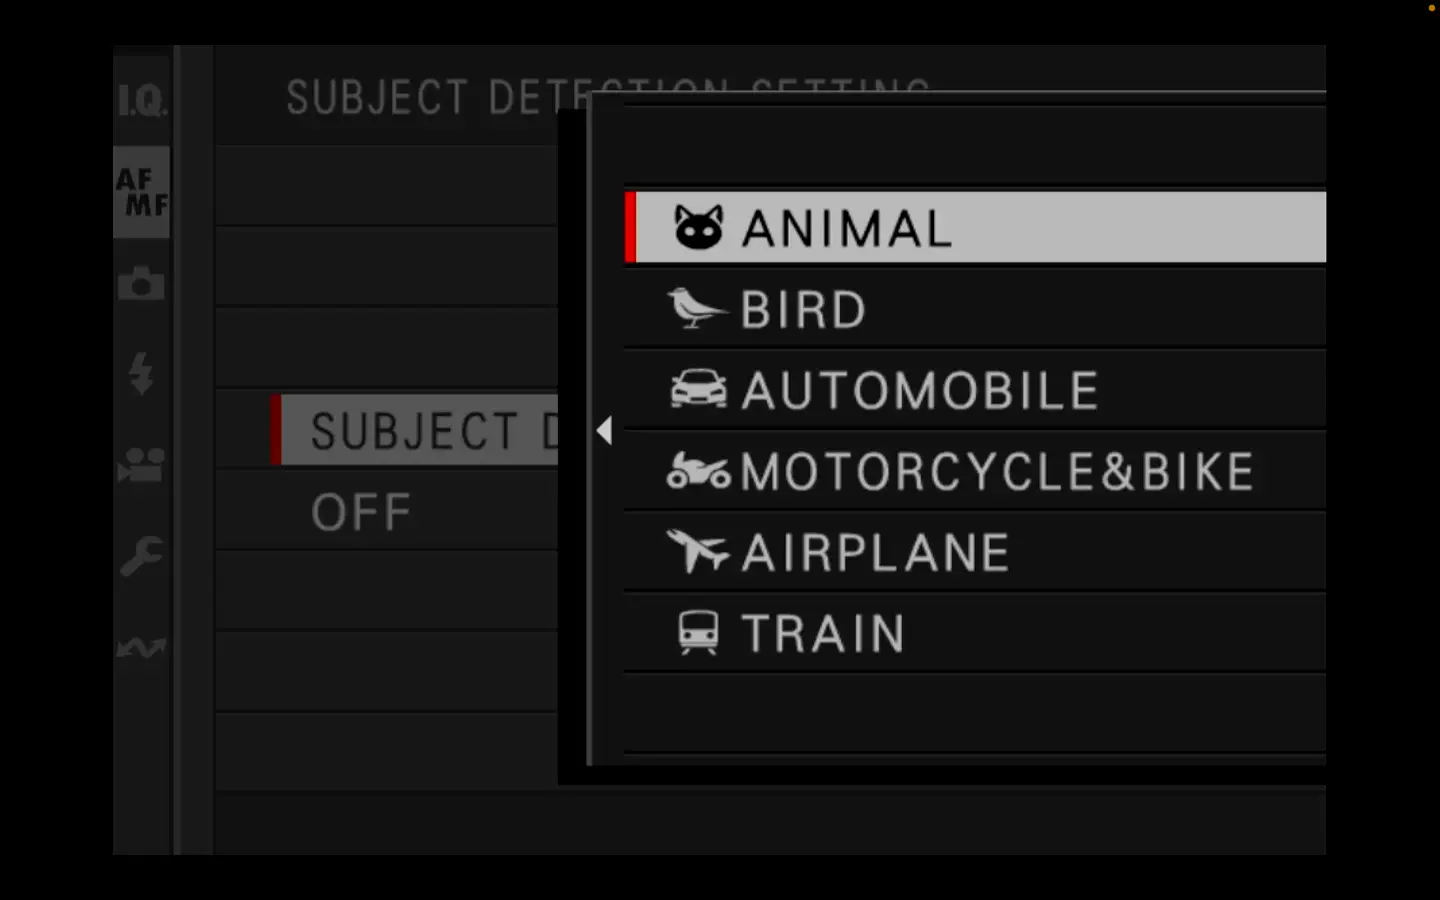
Enabling subject detection in the Fujifilm X-H2S autofocus menu
If your camera does not have automatic subject detection this section won’t have much practical use for you. But, it may still be of interest.
Since July 2022, I’ve used subject detection for the majority of my work which has been mammals and birds in Africa and the UK. The accuracy of the detection works on a stepwise approach. If an eye is recognisable, a tiny AF box will detect and track the eye as the subject moves. Where an eye is not recognised, the algorithm will detect a head. Where a head is not recognised, the overall subject body may be detected. Subject detection may work passively as well as when the camera autofocus is activated.
Subject Detection and Zone Focusing
I’ve seen discussions online about using an underlying zone focus believing this has an impact on the effectiveness of subject detection. I haven’t noticed any difference and I don’t believe this is correct. Single point and zone settings are irrelevant with subject detection as we are using the camera’s artificial intelligence to identify and detect where to focus. However, for a moving subject, I do still recommend having zone focusing as an underlying setting in case subject detection cannot recognise the eye or head at all (see below for more on zone focusing). The custom AF-C autofocus settings (also below) for how our subject moves remain relevant.
Subject detection on any camera is very effective with accuracy and speed. I’m yet to use a system that is 100% perfect though! So, you should still have a good working knowledge of your camera’s overall autofocus system though. The next section on autofocus points is still relevant, so you can take over when necessary.
3. Autofocus Points for Birds in Flight Autofocus
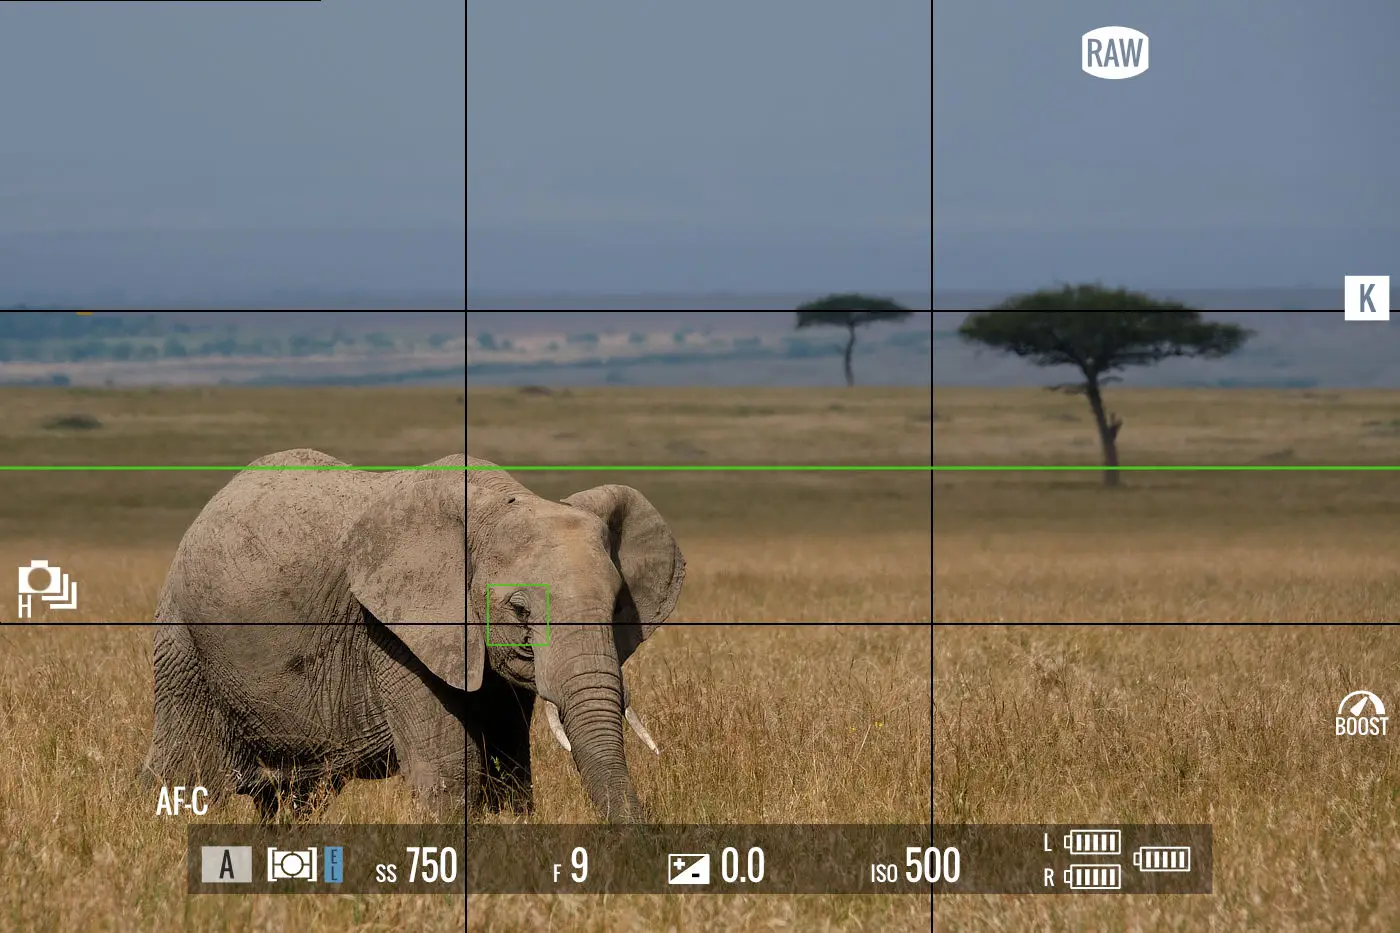
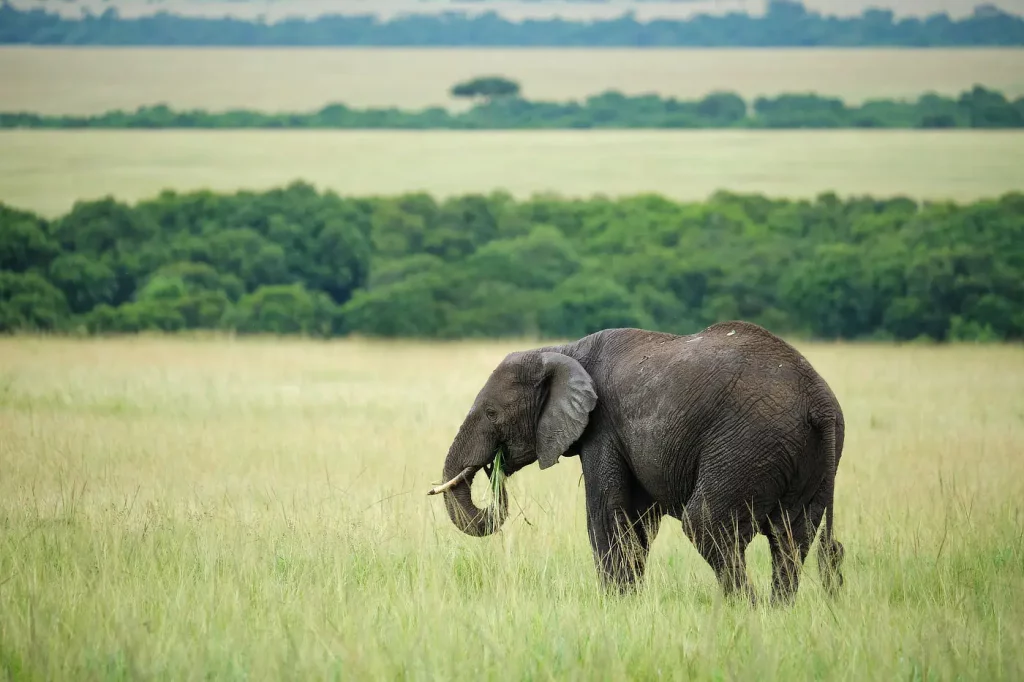
Single point autofocus through the EVF (Simulated)
I know an elephant isn’t really illustrative for birds in flight autofocus settings. But, it is an important step in differentiating how we use single and zone autofocus points. We can use individual autofocus points to determine the precise location of focus in an image. Typically, more ‘advanced’ cameras are likely to have a greater number of individually selectable autofocus points covering larger areas of the frame. You may also find you can choose the number of focus points available for selection in your set up menus. More, isn’t necessarily always better though! My X-H2S has 425 individually selectable points. That can be a lot of thumb-work moving a single point around! I often settle for a lower setting such as 117 selectable points especially with larger subjects.
Single Autofocus Points
With a stationary subject I use a single autofocus point. I move this around the frame to suit my composition by placing it on the key area usually an eye or the head.
When a subject is moving, I use a stepwise approach. If the subject is moving slowly and predictably and I am able to keep a single autofocus point on the key area, I’ll continue with just a single point. Practical examples may include birds or mammals walking or swimming.
Zone Focusing for Birds in Flight
If it is too difficult to keep the subject on a single point, perhaps due to erratic or fast movement, then I will set the autofocus to automatically use different autofocus points intelligently from within small groupings.
On my Fujifilm camera this is called ‘zone’. Currently there are three zone sizes available: 3×3, 5×5 and 7×7. This zone can be moved around the frame for composition purposes as you would with a single point.

3×3 Zone autofocus through the EVF (Simulated)
Just like my stepwise approach to the transition from single point to zone, the size I decide to use is based upon my ability to be able to keep the subject within the zone.
This is led by knowledge of my subject’s behaviour, panning ability and experience and also, use of tripods or monopods (more on that below).
I prefer to use the smallest zone necessary and rely on accurate panning rather than using larger zones.
4. Custom Autofocus Settings for Birds in Flight
Continuous autofocus tracking and speed sensitivity settings can be selected to match how your subject is moving and how the camera should react with potential obstacles.
Presets
There are 5 presets:
1. Multi-purpose (Best described as a default or ‘general’ setting)
2. Ignore obstacles & continue to track subject (If we are tracking and panning with a moving subject and there is a potential for interference from obstacles)
3. For accelerating and decelerating subject
4. Suddenly appearing subject
5. Erratically moving and accelerating or decelerating subjects
Custom AF-C for Birds in Flight Autofocus
Furthermore, some cameras have another option where we can adjust the tracking sensitivity, speed tracking sensitivity and zone area switching to create our own autofocus setting.
If your camera doesn’t have this custom setting, I’d recommend using preset number 5, Erratically moving and accelerating or decelerating subjects.
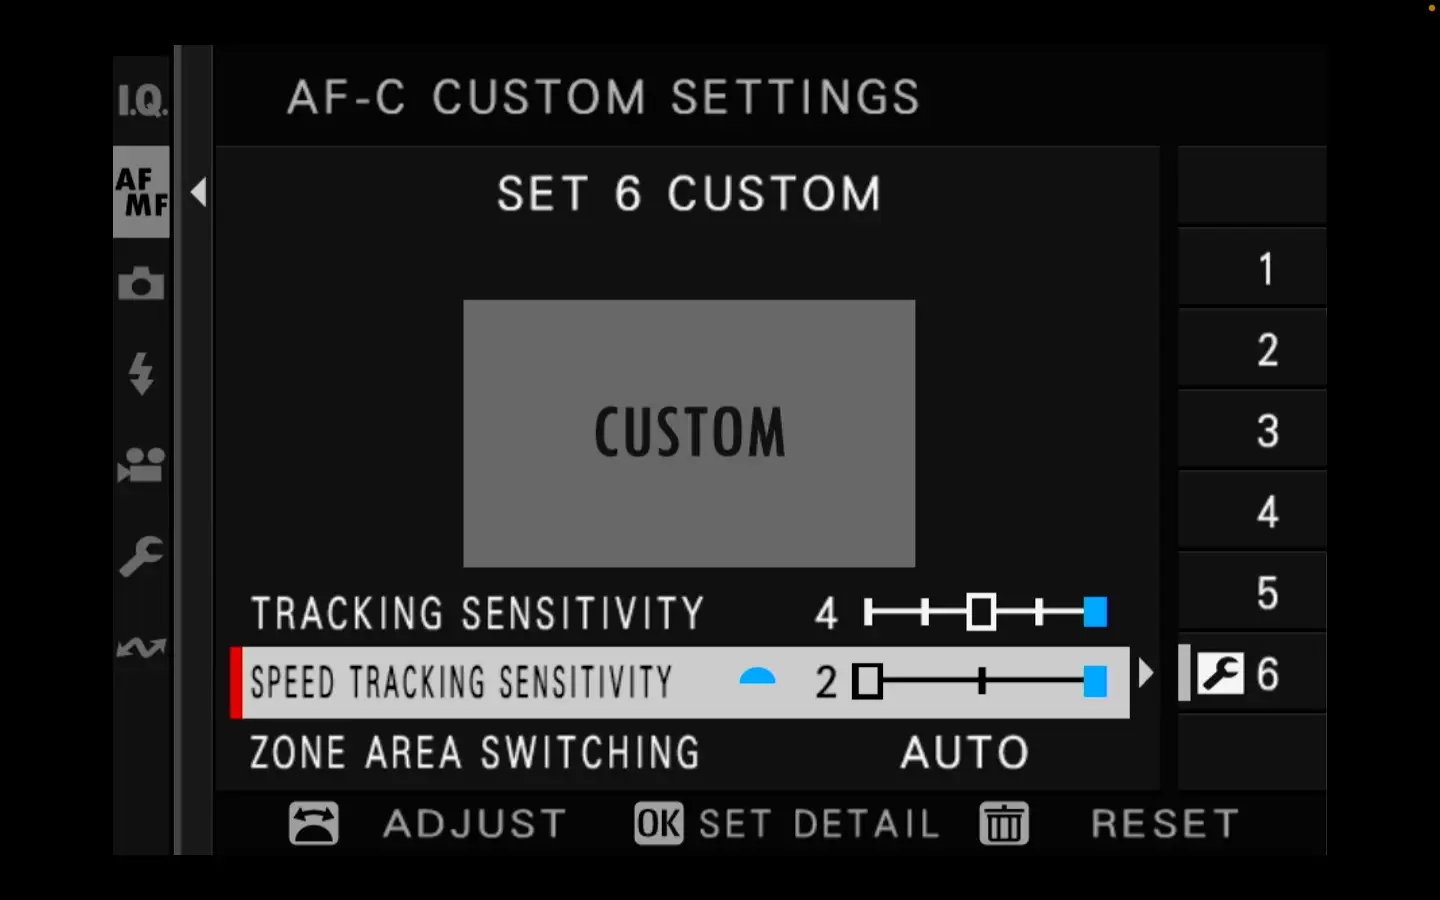
Option 6 custom continuous autofocus settings
For birds in flight autofocus I opt for the following custom setting:
- Tracking Sensitivity: 4
- Speed Tracking Sensitivity: 2
- Zone Area Switching: Center
Tracking Sensitivity – higher values mean the autofocus is less likely to hunt by refocussing on distractions once focus has been achieved. Think of it as how loyal autofocus is to your subject.
Speed Tracking Sensitivity – higher values mean the autofocus is more sensitive to changes in subject speed.
Zone Area Sensitivity – which part of the AF zone the camera prioritises.
Overall, I recommend experimenting with each of these preset custom continuous autofocus settings and the customisable setting. Understanding how they work will help you apply them to different situations.
Once you have mastered your camera’s autofocus system you are well on the way to achieving consistency in overcoming the challenges of focusing on moving subjects. Let’s not forget about the basics though…
5. Aperture, Depth Of Field & Shutter Speed
Aperture
With most wildlife photography, our goal is to ensure the eye and the key facial features are sharp and within the depth of field.
Consider the ambient light and the colour / brightness of the species you are photographing. In sunny conditions, I’ve photographed Arctic Terns at f/13! Thanks to their bright white feathers, a greater depth of field can be used while maintaining fast shutter speeds. This has helped with small focussing errors for this very fast and erratic moving species.
In many cases, it is difficult to close the aperture sufficiently to ensure the whole bird is within the depth of field. When using long telephoto lenses, we often need all of the light we can get to maintain fast shutter speeds. Generally, I don’t worry about feet, tails and wings drifting out of the depth of field as long as the head is sharp. In many cases, I think blurring of the wings, caused by shallow depth of field or shutter speeds can provide a more dynamic feel to a photograph giving a sense of action and movement.
Shutter Speed and ISO
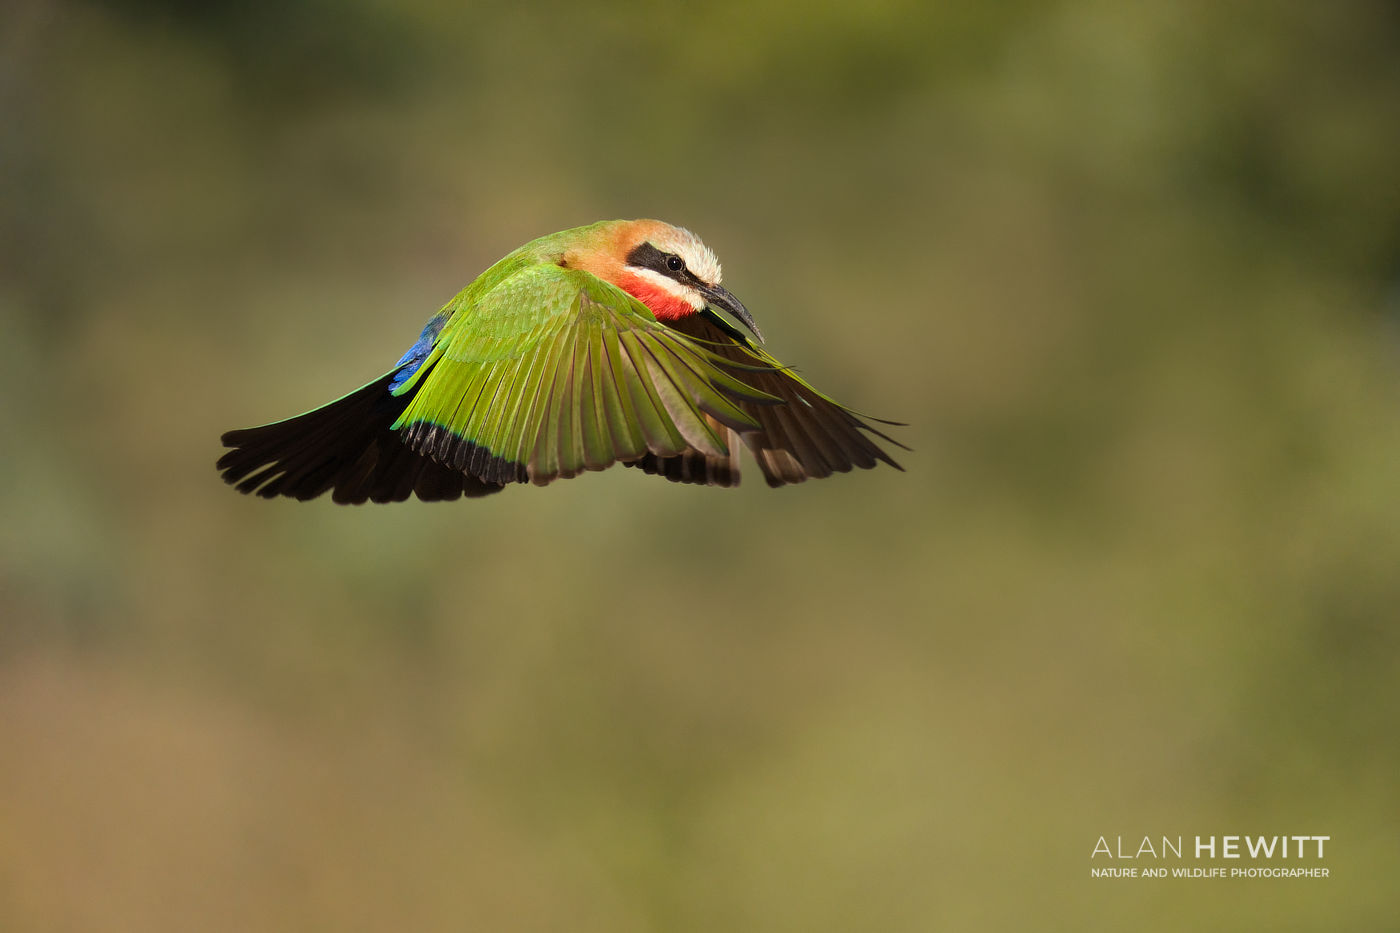
White-fronted Bee-eater – Fujifilm X-H2S & XF150-600mm
There is no absolute recommended shutter speed as different species move at different speeds. As a rule of thumb, I would try to keep shutter speeds at a minimum of 1/500 sec for large walking mammals such as leopards and lions. That said, at dusk I’ve photographed a lioness and cubs walking directly towards me at 1/75 sec. It’s far from ideal though, I was relying on luck! This just leads to inconsistent quality and results.
For birds in flight we really need to be above 1/1600th sec but different species have very different flight movement, there are always exceptions and experience will become a key factor in helping you make this judgement. For example, fast birds such as the bee-eater above need shutter speeds of around 1/3200th sec.
Don’t be afraid to increase your ISO. If your shutter speeds are too slow then your autofocus settings and technique are pretty much redundant. Cameras and post-processing software are so much better at dealing with high ISO compared to a few years ago. We can deal with noise easily, but rescuing a blurred photograph effectively is altogether a different challenge.
6. Handhold or Tripod?
I don’t know of any tripod and head combination that is as simple and intuitive as using our hips, waist and shoulders for panning and tracking with a moving subject.
If you can handhold your camera and lens it offers you so much more freedom of movement. However, even the lighter long telephoto lenses can quickly put a strain on our arms. Especially when the action is happening thick and fast!
A solid tripod is the best option for stability and taking the strain. Choose carefully, not all tripods extend high enough to keep the camera at eye level and it is uncomfortable to be constantly lowering your neck to see through the viewfinder.
Your choice of tripod head is crucial and by far, a ‘gimbal’ type of head or tilt and pan is the most suited for photographing birds in flight. My own choice is a Trinity Airhed Pro by 3 Legged Thing. This type of tripod head allows effortless, fluid and balanced movement. If you’re using a head like this, it is also worth considering a levelling plate. Some tripods have these built into them already. Placing a levelling plate between the tripod and head is a great convenience. It’s very unintuitive to pan with when you are also compensating for a tripod that isn’t perfectly level. A levelling plate allows you to get level very quickly without making numerous time-consuming micro adjustments to your tripod legs.
7. Fieldcraft
Ignore fieldcraft at your peril!
It’s not just about species recognition or safety and ethics, although these are very important of course.
Think about how you position yourself in relation to your subject’s movement and position. Subjects which are moving rapidly towards you represent the most challenging type of constant movement for your autofocus system.
Instead, consider positioning yourself so subjects are moving across your field of view. By keeping the subject at a more consistent distance rather than a rapidly decreasing distance, you’ll find your autofocus performs much more efficiently as it has much less movement to deal with.
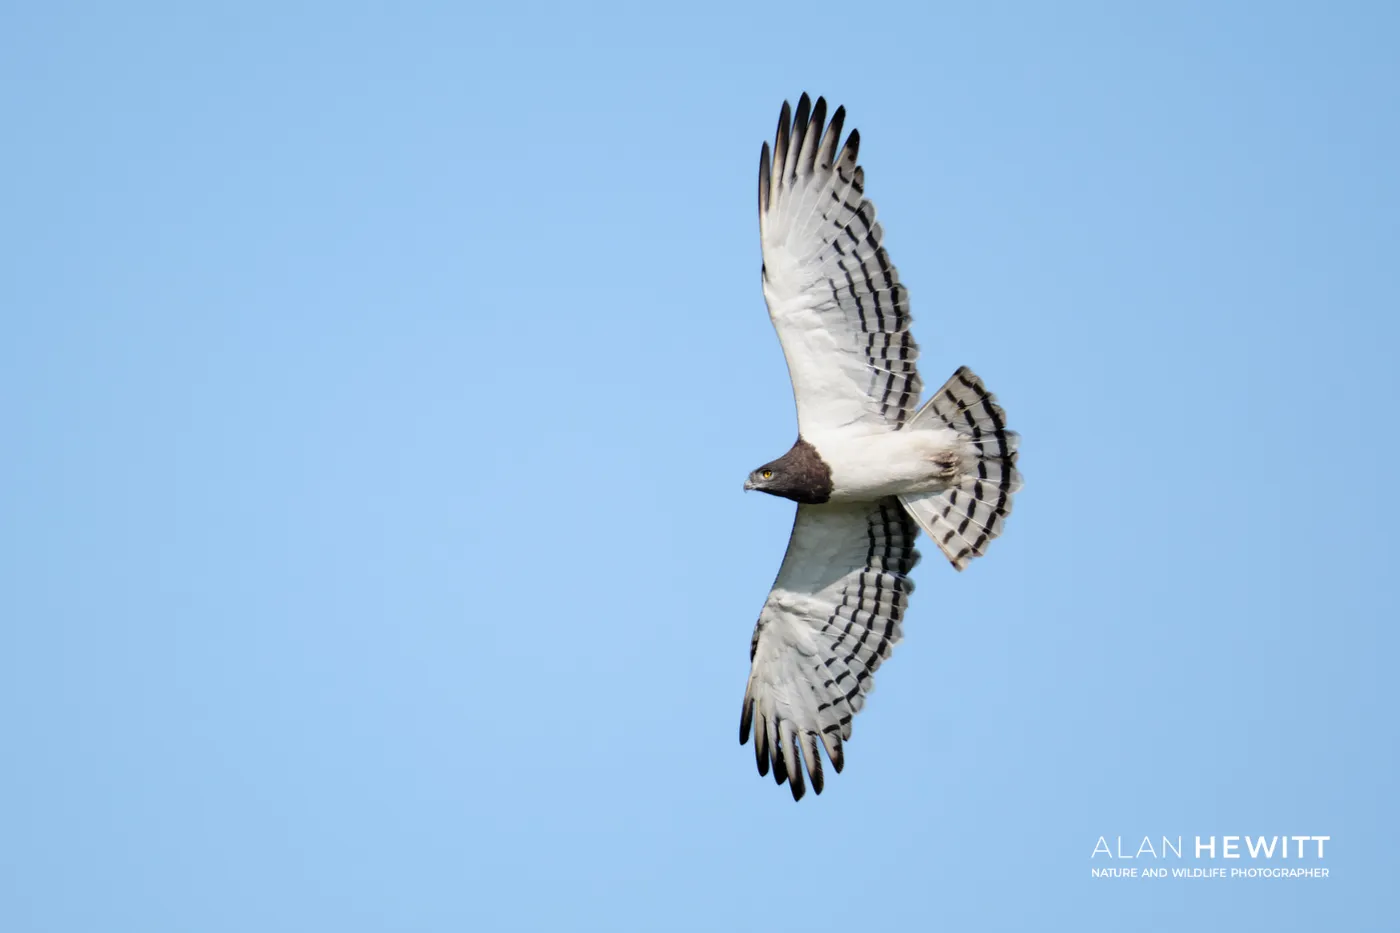
Black-chested Snake Eagle – Fujifilm X-H2S & XF150-600mm
Think about your background too. Autofocus systems are much more efficient at acquiring and maintaining focus without confusing backgrounds. Next, think about the wind direction. Your camera’s autofocus will perform a lot more efficiently and consistently with a slower subject. If you can position yourself with the wind on your back, a subject which is flying towards you is likely to be flying a lot slower than it would be with the wind behind it. Most birds will take off into the wind to gain lift.
A common mistake is to wait too long before focussing on your subject. Get your subject in focus in your viewfinder while it is in the distance. You’ll give your autofocus more time to acquire focus and it will be much easier to track and follow compared to trying to react to something considerably closer. Give your subject plenty of room in the frame too, it’s very easy to clip wings, tails and heads when it gets closer!
8. Back Button Focus and Birds in Flight Autofocus
Some cameras have a dedicated AF-On button. If your camera doesn’t, you may be able to assign this function to another button.
The technique of back button focusing is using this AF-On button to activate the autofocus instead of the traditional half-squeeze on the shutter button method.
A popular misconception is that back button focus is the holy grail for birds in flight autofocus. There are no cameras (certainly none I know of anyway!) which have some secret super autofocus settings which are only enabled in back button focus. All autofocus tracking settings can be equally applied to shutter button focus as they can to a back button / AF-On method.
Back button focus is about deactivating autofocus from the shutter button. This allows you to focus and recompose while in a continuous autofocus mode. I may do a separate blog on that, but then again maybe not as it’s an absolutely obsolete concept, in my opinion! Actually, I may do a blog on why it is obsolete, that’s a better idea. Anyway…
9. Lens Focus Limiter
Most long telephoto lenses, regardless of prime or zoom, have a focus limiter switch. Careful use of the options on the limiter can be a great assistance to the overall autofocus speed of the camera and lens. I’ll use the Fujifilm XF100-400mm for this example. The XF100-400mm lens minimum focus distance is 1.7m. The focus limiter switch has two options, full and 5m to infinity ∞.
If we set the limiter to ‘Full’, the lens will try to focus using the full distance range from 1.7m to infinity ∞. Generally, it is the closer distances where autofocus systems do the most work to find critical focus. If you know your subject is very unlikely to come within 5m of you and your position, by setting the limiter to ‘5m to ∞’ we are preventing the autofocus hunting in this closer 1.7m to 5m range. The result, more efficient and faster autofocus! The critical part is that you must remember you have used the focus limiter switch. If you then try to focus on something which is within the 1.7m to 5m range, panic will set in and you will need to switch it back to ‘Full’.
10. Performance Boost
For cameras with performance options, set it to ‘boost’. This increases autofocus responsiveness and performance as well as improving EVF frame rates.
If you use an additional vertical battery grip, you may find a performance selector switch on the body. Otherwise, it can be changed via the power management settings in the set up menu. Performance boost does reduce overall battery life, but it’s worth it!
11. Pre-Shot
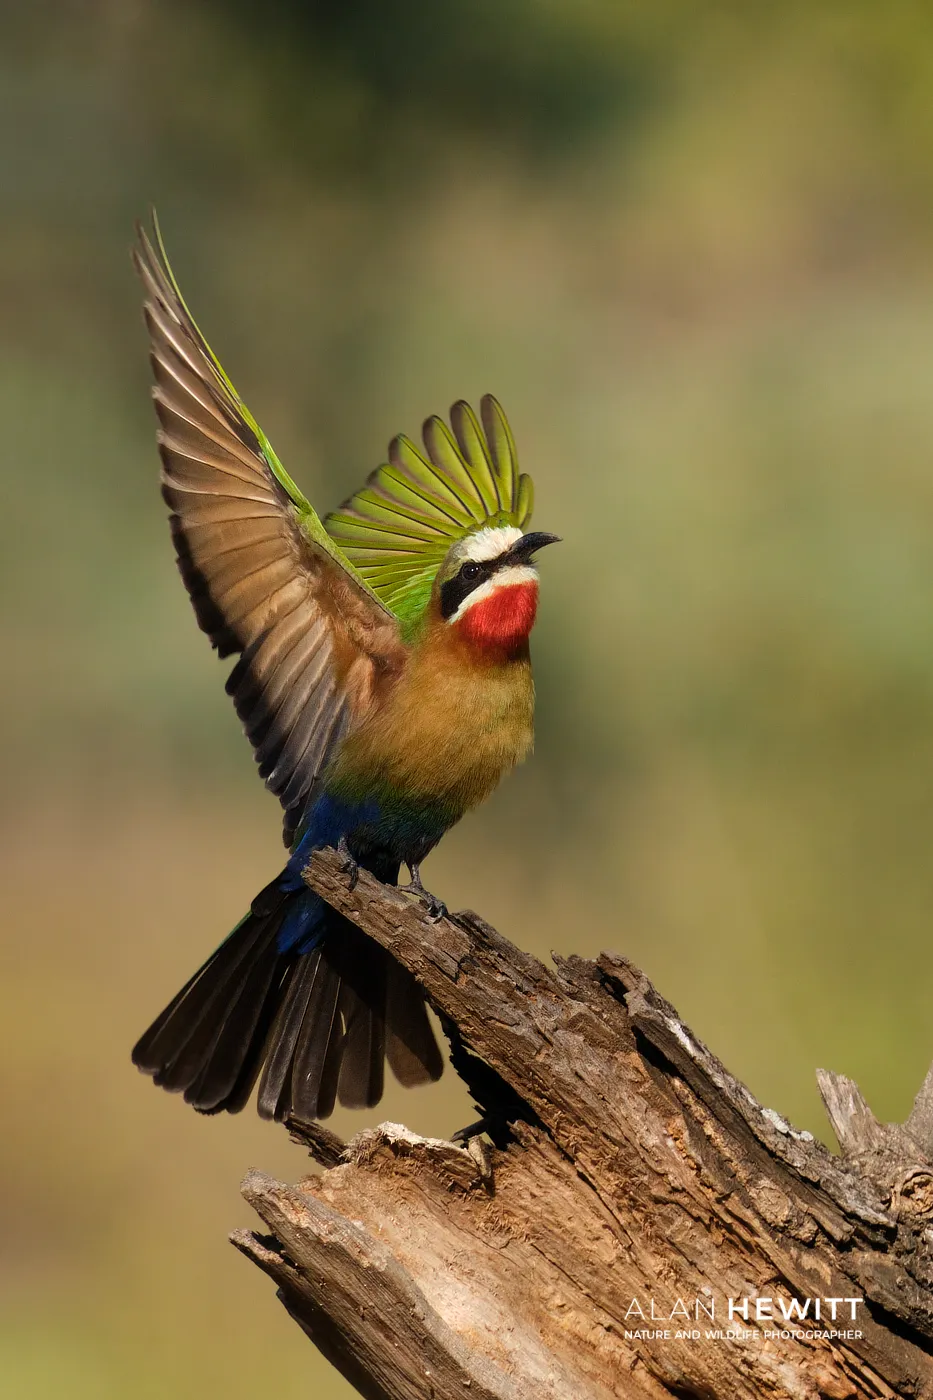
White-fronted Bee-eater – Fujifilm X-H2S & XF150-600mm
Okay, I know this isn’t an actual birds in flight autofocus setting. But, it is an incredibly effective tool for action photography, particularly when a bird takes to flight. The Fujifilm X-H2S gave me my first opportunity to use this technology in a wildlife photography habitat.
With pre-shot enabled, when we are focussing on a subject the camera is silently recording frames into the buffer then discarding them unless the shutter is released. Once the shutter is released, the photographs held in the buffer which have been ‘silently’ taken during the last second or so are written to the memory card.
It’s an incredible setting to use when anticipating action that can happen too quickly for us to react to. This bee-eater photograph is a good example, they are incredibly fast and unpredictable. Even with a good understanding of animal behaviour and fieldcraft, it is exceptionally difficult to react quickly enough to photograph their first and often most dramatic wing beat as they take to flight.
Pre-shot only works with electronic shutter enabled and I wouldn’t advise having it on permanently. I’ve assigned it to one of my custom function buttons so it can be switched on and off in any of the exposure or custom modes I am using.
12. Final Words on Birds in Flight Autofocus
Successful birds in flight autofocus photography is achieved by learning how your autofocus system works and how you can fine tune it to give you the best possible results. Don’t under estimate the importance of fieldcraft knowledge and make sure you continue to use the fundamental knowledge too, i.e. aperture and shutter speed.
Applying the technical aspects, the technique and the fieldcraft means there is an awful lot to think about and more often than not, in a very short space of time! Don’t get disheartened if it takes quite a while to come together. Above all else… Practice!
This blog post is an update to an older blog post I wrote a while ago on my own Alan Hewitt Photography website. It covers my approach and you may find you have different techniques and settings which work better for you.
Leave a Reply