


Framing the Wild – a series of blog posts that takes you behind the photograph. It’s where we break down how we read a scene and the decision process behind composition, framing and camera settings; also, what we consider in the edit process when deciding which photograph stands out in the same overall collection.
From Blog Inspiration to Safari Adventure!
Wild at Mattikoko – The Great Migration
26th August 2027
7 or 11 nights available
Wild at Mattikoko – The Green Season
March 2028 (TBC)
7 or 11 nights available
Supporting conservation and communities through ethical safaris. Join us on unforgettable photography safaris led by professional guides and photographers.
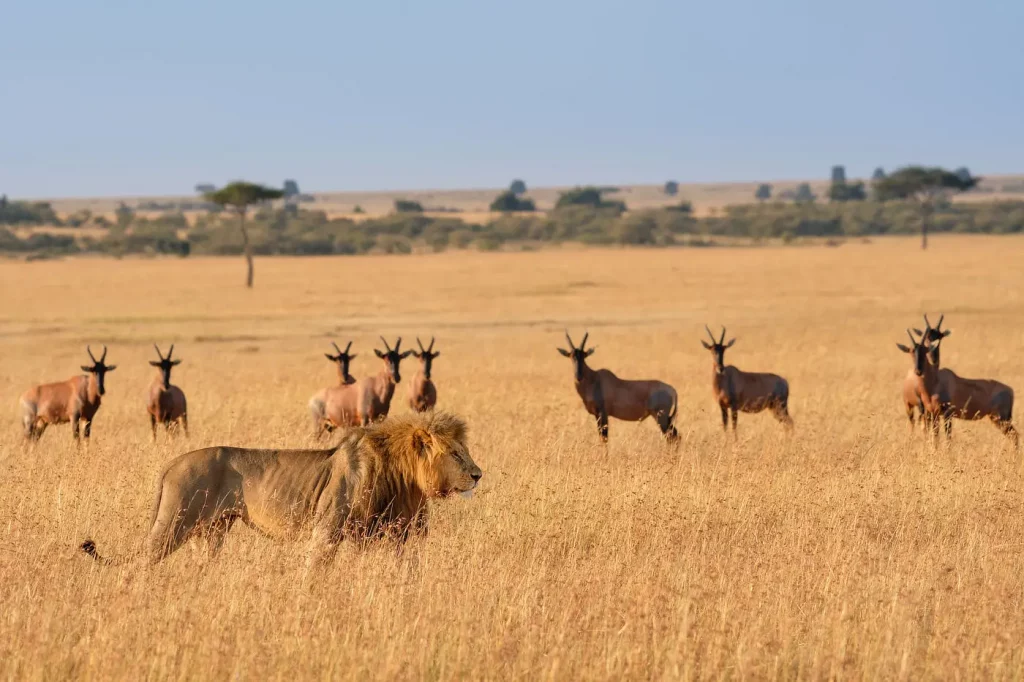
Framing this Back-lit Lioness
1 – Composition
This shot is all about a minimalist, graphic approach. Rather than lighting the lioness’ face to reveal detail, it does the exact opposite. Most of the frame is deep shadow, with the back-lighting catching just the edges of her fur to define the shape of the head.
The result is a simple line of light: a profile rather than a portrait, and that restraint is what gives it impact.
Fur, hair and feathers often make this kind of shot really stand out because the back-light can frame the animal in an interesting way. You can see the beautiful warm light coming through the fur here.
In terms of cropping, I didn’t take the classical editing approach of putting the head on the left with a lot of space for her to look into. I did still want some negative space on the right, but I was really interested in continuing the line of fur down her back to create the full shape. This moves her over to the right a bit and creates a really graphic trace around the body and head, which contrasts with the near black background.
I’d taken a sequence of shots, but chose the one that looked like it had most graphic shape potential. This one was the most satisfying image of the set.
2 – Exposure
With the sun directly behind her head, the key was stopping the camera from lifting the exposure and ruining the effect. I was in manual mode with auto ISO – my usual approach – and deliberately pulled the exposure down using exposure compensation. So I’d fixed the aperture and shutter speed and exposure compensation dragged the ISO down to darken the image. An automatic exposure mode would have simply averaged the scene and tried to brighten it, completely losing that graphic silhouette.
The aim was to keep the image as dark as possible while holding that rim of light. The key thing was to not allow the camera burn out the highlights. If the exposure had been higher, the fur would have been over exposed and when that happens, there’s nothing you can do with it: the camera just stores pure white (or 100% of whichever RGB channel is overexposed) and reducing the exposure when editing just makes the brightness less – it doesn’t restore any detail.
In the end, even after I exposed for the highlights and dragged the exposure down as much as I could, the photo was still a bit lighter than I wanted it, so I darkened the shadows / black point in Lightroom so that the back-lit fur stood out.
3 – Angle
We were fortunate with positioning. The lioness was elevated with the low dawn sun rising directly behind her. That combination made the shot possible.
We only needed a small adjustment to line the sun up perfectly behind her head and create that clean rim light. Early morning light was crucial too, for its softness and its warm tone.
One thing that’s often overlooked with early morning and late evening light is that it’s more directional than at other times of day and tends to come straight at you, rather than from an angle above. There’s only a bit of sunlight coming over the horizon so the light is more direct and less scattered. To be pedantic, the bluish parts of the light spectrum have already been scattered in Earth’s atmosphere at this time of day, leaving only the warmer part of the sun’s light. But those warm rays tend not to light up the surroundings as much, because they come in at a low angle. This means silhouettes are easier to manage without stray light.
Leave a Reply